Recruitment Flow
What is recruitment flow for?
Recruitment flow provides an overview of the necessary steps that need to be taken for successful recruitment. A process set according to the needs of a specific position will help all involved parties, not only recruiters but also hiring managers and candidates.
Unlike a single generic system recruitment process, this flexible approach has these advantages:
- Recruiters know exactly what to prepare for in the given recruitment and can monitor the effectiveness of each part of the process both through SLA rules and within reporting.
- For hiring managers, it is easier to understand what is required of them in the given step and they also know what happens to candidates afterward.
- It is easy to inform candidates in detail and specifically about the recruitment process thanks to preset actions and templates for communication.
How to set up recruitment flow?
In ATS Recruitis, you can set up any recruitment process, and moreover, you can create multiple ones and assign different flows to different positions as needed to best reflect your actual processes, all in Settings > Recruitment Flows. More about how to do it can be found HERE (will be added).
Where can you find recruitment flow?
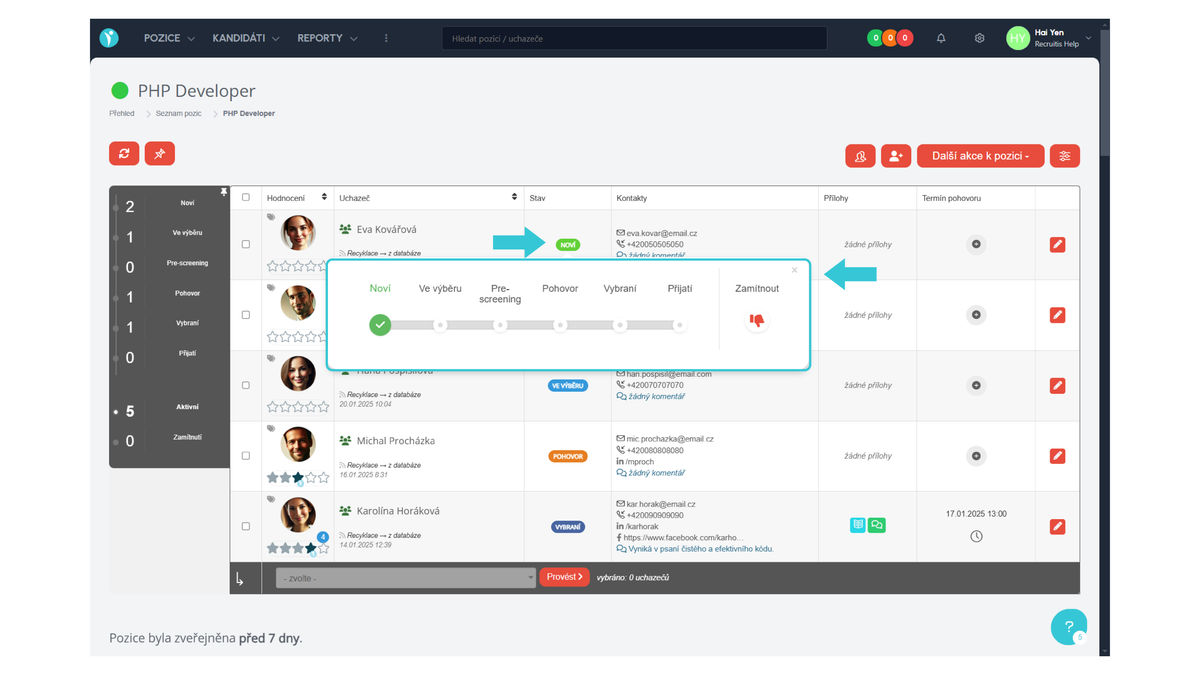
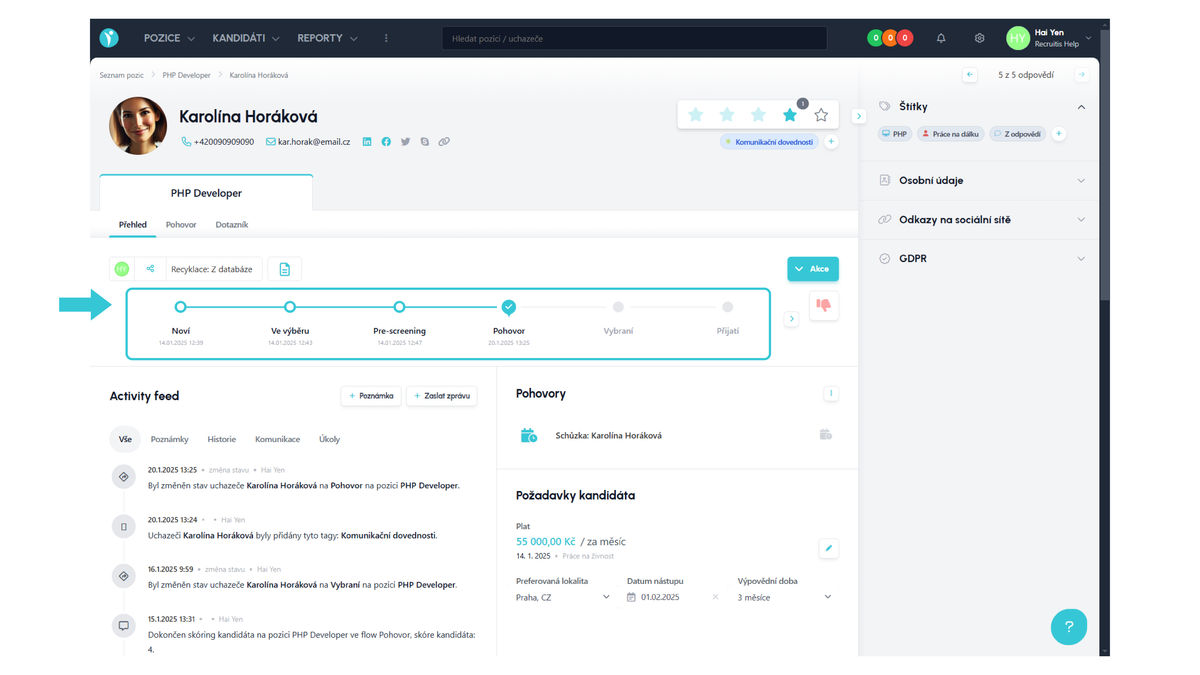
Recruitment flow is primarily visible on the candidate card who has applied for the given position.

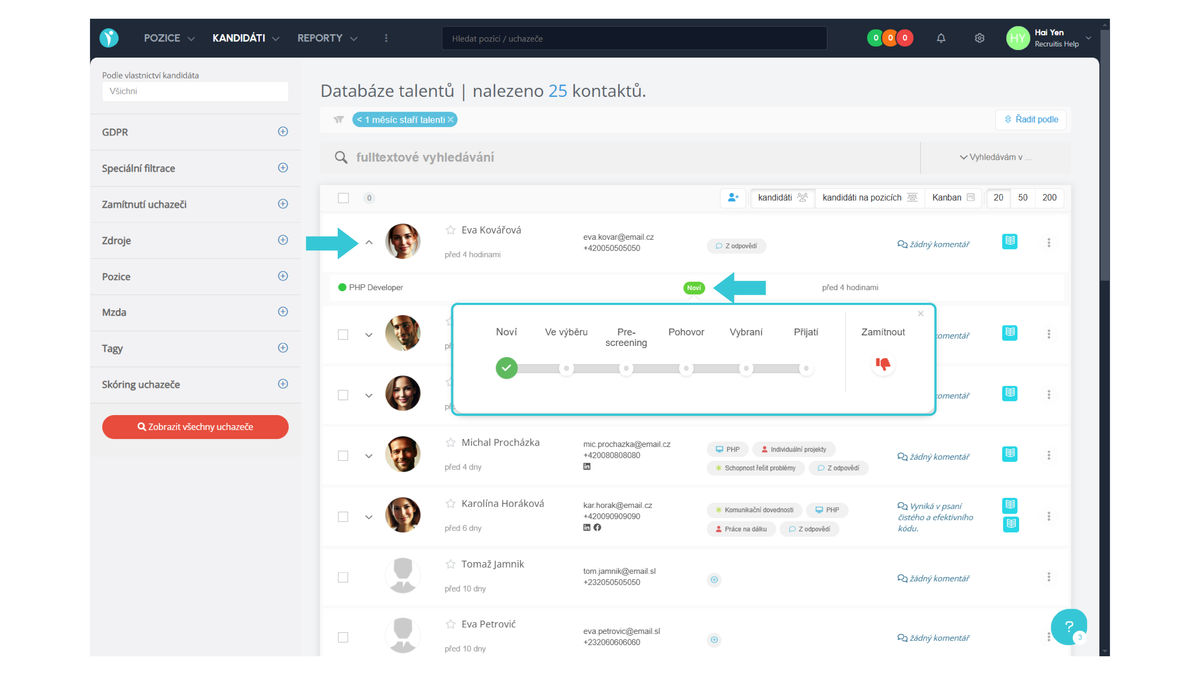
You can also find it in position details for individual candidates and in the talent database.
How to work with recruitment flow?
Working with recruitment flow is very simple. Candidates can be gradually moved in the flow simply by clicking on the given recruitment phase.
What happens after moving a candidate to a new state depends on the action assigned to the target state:
- For example, you have the option to inform the candidate about the state change via email or SMS.
- You can schedule an interview for the candidate (if it is a state with an interview action) - the action is defined in the recruitment flow settings, more about how to do it can be found HERE (will be added).
- You can mark the candidate as accepted for the position (if it is an acceptance action).
- You can send a questionnaire to the candidate if it is an action with a questionnaire.

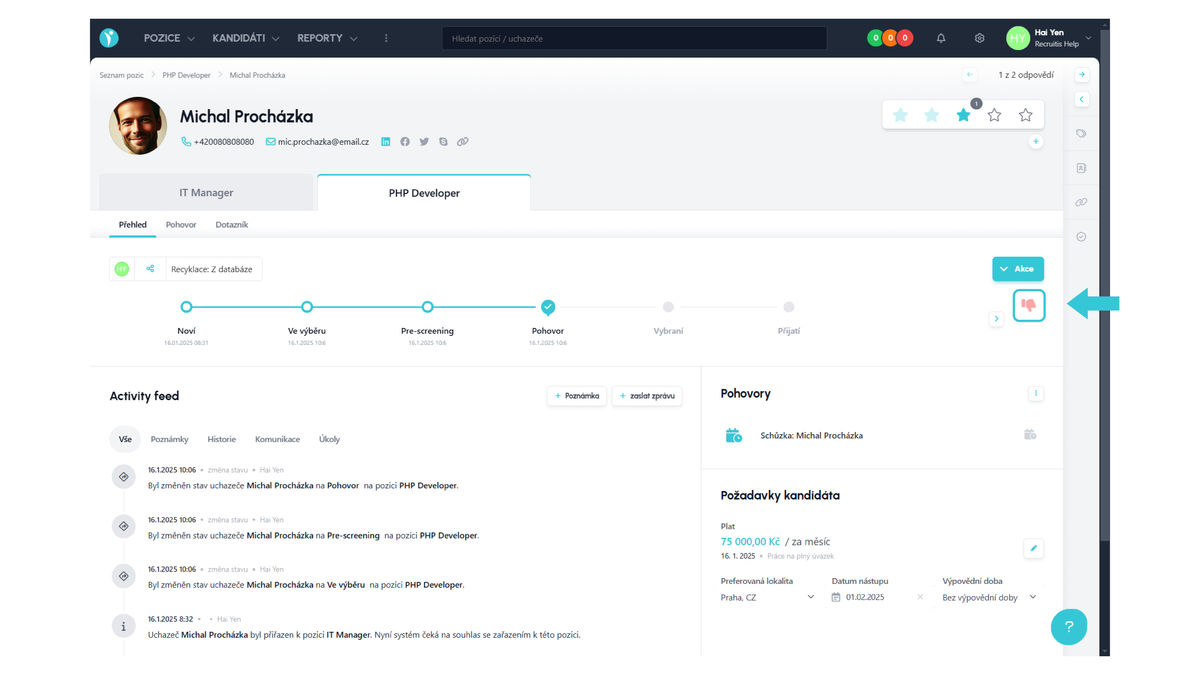
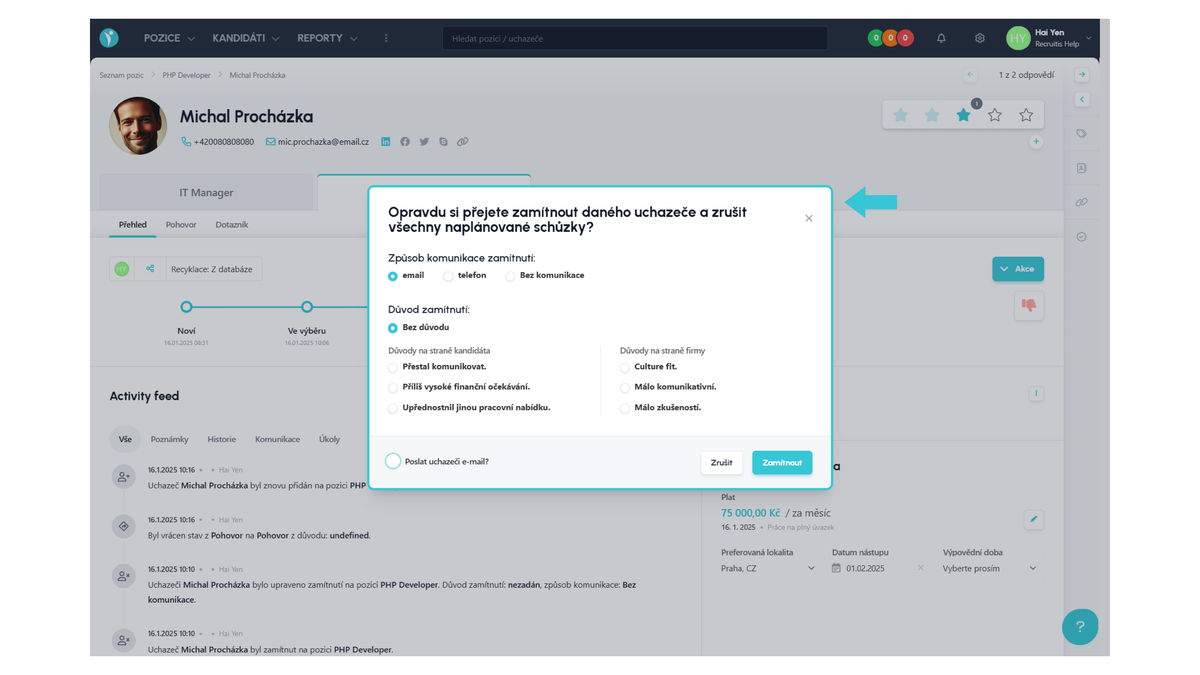
If the candidate is not suitable for the given position, you can simply reject them by clicking on the red button with a thumbs down next to the recruitment flow.
Then you select the notification method for the candidate and the rejection reason. How to create your own rejection reasons can be found HERE (will be added).
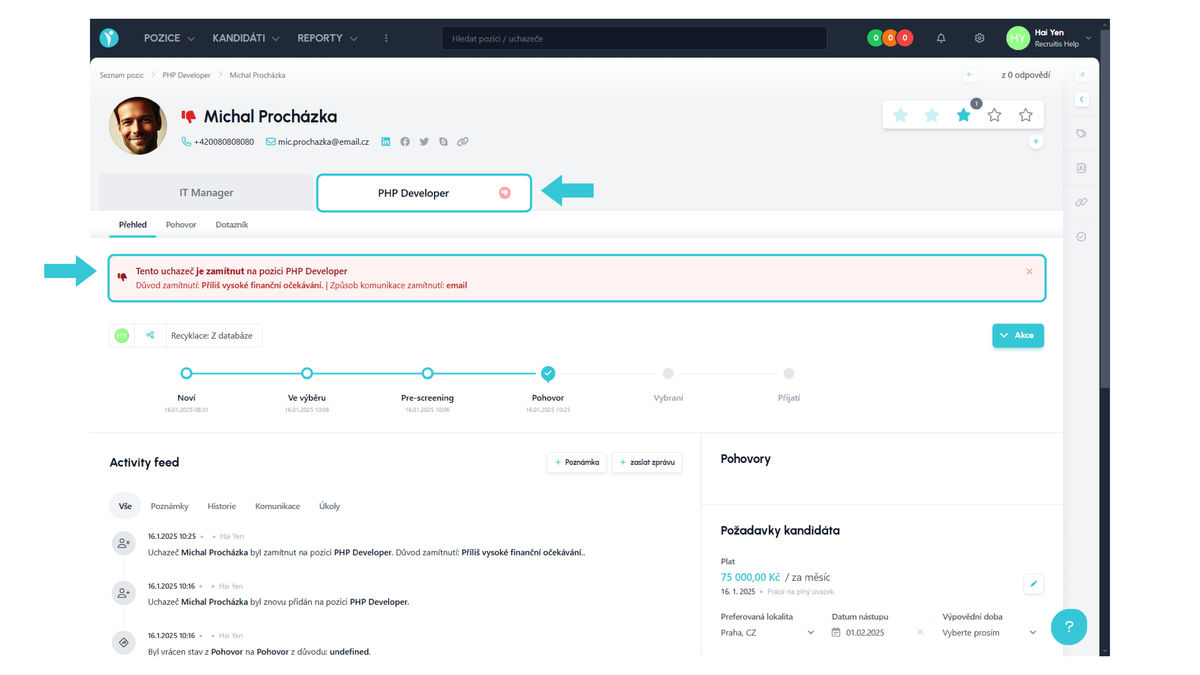
You can recognize a rejected candidate on the candidate card as follows:
- There is a red thumbs down next to the given position and you will find rejection information here.
- You can no longer work with the candidate on the position; you cannot move them in the flow, etc.
Good to know
- A rejected candidate still retains information about what state they were rejected in (i.e., they are technically still in that state, just not active), which is very useful when searching for suitable candidates for new positions in the database.
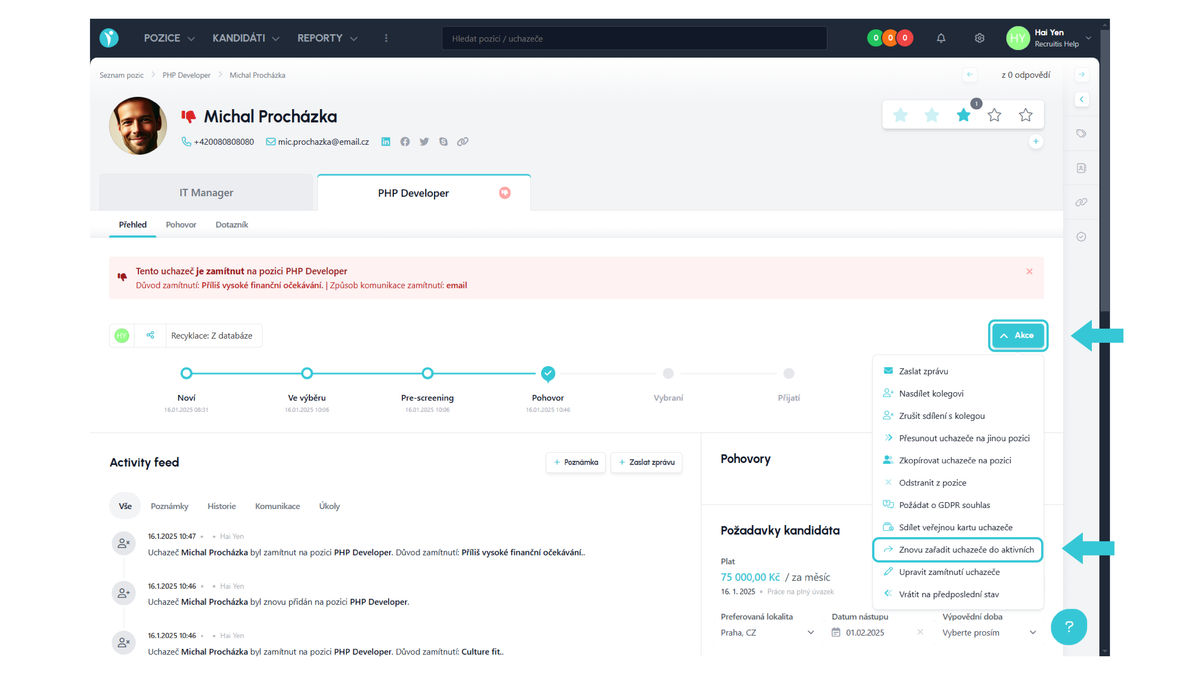
- If you want to return a candidate to the flow for some reason, just click the "Actions" button and check "Reinclude candidate in active". The candidate will no longer be rejected and you can continue working with them.
- If you accidentally move a candidate to a new state, you can undo the change using the "Return to previous state" action.
- Actions defined in individual states also control the connection to the corresponding email template category, which is offered when moving in the flow.
- If you want to change the recruitment flow for a given position, all candidates will be moved to the new state on the candidate card. However, records of historical moves in the original flow will still remain in the action history. Therefore, it is important to carefully consider flow creation and possible changes, as this can have a significant impact, for example, on statistics or the current display of the candidate's state.
- If you move a candidate to the next state but don't want to send them an email or SMS about it, you can simply cancel (i.e., not execute) the sending - meaning the system does not perform the action in the background for you.
- The flow move action and its timestamp have fundamental significance for reporting and SLA measurement - the move should therefore be made at the moment that is decisive for the action - so, e.g., when I share a candidate with a hiring manager and I have a "Sent to HM for approval" state in the flow, I make the flow move right after I share the candidate, not maybe tomorrow or once a day after sending all candidates. Otherwise, data in reports will be distorted and wrong conclusions could be drawn and unnecessary or incorrect measures for streamlining the process could be implemented.
Related articles
ATS Recruitis from a hiring manager's point of view
How does the user in the role of hiring manager see ATS Recruitis?
Enable personalized calling on the Recruitis mobile app
Settings required to display candidate name on incoming calls for iOS and Android devices.
Mobile application - overview of functions
What can our brand new version of the mobile app do?